|
|
Posts: 141
|
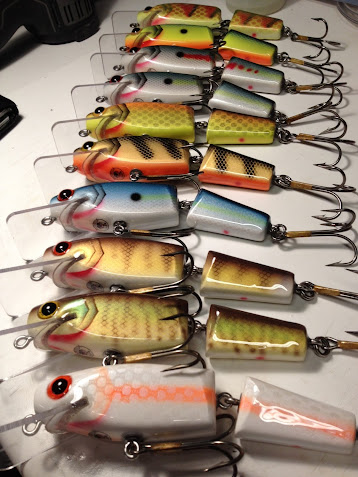
These are some more little gill gliders I made for this year.  


----- http://www.bgmbaits.com/ |
|
| |
|
Posts: 572
Location: Maplewood, MN | If that doesn't look like a gill, i don't know what does. Very nice! |
|
| |
|
Posts: 132
Location: The Netherlands. | Those are some nice lures ! |
|
| |
|
Posts: 141
| Thanks guys It's a bit difficult to get action out of little gliders like these, I think they turned out well. I drill two 3/8th inch diameter holes diagonally towards the tail of the lure body one and a quarter inches deep. They are small holes for pouring lead in but, it seems to be the easiest way to get an action out of these little guys. Check out the action in the video link! http://youtu.be/Zxi6nxXg4qo ----- www.bgmbaits.com |
|
| |
|
Posts: 141
| Heres a custom painted swimbait I just finished. I was going for colorful, but not too crazy. It's 3.3oz and 7 inches long. 

----- www.BGMbaits.com
|
|
| |
|
Posts: 141
| And another


----- BGMbaits.com
|
|
| |
|
Posts: 1174
| Nice looking baits. Especially the swim baits there. I don't remember seeing your work before but I like it. |
|
| |
|
Posts: 141
| Thanks I'm glad you like the swimbaits!
I make them from molding solid two part resin in RTV silicon molds. The carving and construction of the master blank is the most tedious work apart from the painting of each resin blank I suppose. 

After the resin is poured into the mold and hardened the blank just needs the excess carved off and a little sanding. The resin is also mixed with the right ratio of microballon powder, making it so the resin floats. It would sink like a rock otherwise.


The joints are held together with stainless steel rods that run all the way through the lure body. And I weigh these swimbaits a lot like a glidebait, so it sinks belly first. These Bull Shad swimbaits are by far my favourite lure I make right now, so I thought I would share a little of how I do it. ----- BGMbaits.com
|
|
| |
|
Posts: 141
| I took some pictures along the way as I painted a big Brown Trout Twitch/Trolling Lure. Thought it would be cool to share. 

The dots are masking fluid

White base coat after the masking fluid dried


After removing the masking fluid


After the clear coat


|
|
| |
|

Posts: 369
| Those all look amazing, I like the pictures that you posted that showed how you made them and poured them,. Truly amazing work!
-Zachary |
|
| |
|
Posts: 141
| Here's the finished lure with all of its clear coats. I call it the Bloody Brown Trout.


----- BGMbaits.com
|
|
| |
|

| Those are sweet, love that brown trout! Thanks for sharing! |
|
| |
|
Posts: 444
| Cool stuff all around.... |
|
| |
|
Posts: 532
Location: Ogden, UTAH 10 minutes from pineview reservoir | the bloody brown trout is awesome!!! |
|
| |
|
Posts: 141
| Thanks guys,
Here are some randoms I just finished. I'm going to test them/fish with them a little today. 


----- BGMbaits.com
|
|
| |
|
Posts: 141
| Here's a Grayling crankbait I did from start to finish. It's carved from an old chunk of Mahogony wood. 
All carved out and weighed..
 Lip and line tie epoxied/screwed in.. 
After a layer of sealer, resin, and then foiled. 
Before the resin underneath the foil hardens, it's easy to push scale patterns into the foil with a steel mesh. 
After some airbrushing/painting 
Add the eyes, sign, and clear coat. Here's the finished bait! 

----- BGMbaits.com
|
|
| |
|
Posts: 141
| Finished this 10 inch long Crappie swimbait today. It's going out for its test swim tomorrow.. 


|
|
| |
|
Posts: 304
Location: PA | Nice looking baits, good job on them. |
|
| |
|
Posts: 141
| Thanks, Here's a little Mahogany crank I just finished. I've been learning a lot about crankbaits lately, and how to get the most out of them. It seems to me that when you add the ballast to the center of gravity you consistently get good results. I use a pair of calipers, but you could just use your thumb and pointer finger probably, and grab the bait on either side. Then if it falls forward or backward, you just adjust where your grabbing until the lure balances perfectly. Then just mark along the belly where your grabbing the bait, drill straight, and use a good forester bit when you drill. When you add the lip, line tie, and screw eyes I find it puts a little more wight towards the front. I think this is a good thing because it allows for a straight lip crankbait to catch some water right away and there's no extra reeling to get the crank to start cranking. Maybe some of you guys have have some more solid techniques, but I wanted to share what I do, and enjoy the lure! 

|
|
| |
|
Posts: 141
| Hey Everyone,
Just moved into a new house last week and I'm getting back into the bait making groove. I love my new basement shop! Plan on producing many baits from it.
Here's my latest batch. 


|
|
| |
|

Posts: 17
| Marling,
Im a new fan of your work bud! That Crappie Swimbait is COOL!!!
Tater Hog |
|
| |
|

Posts: 20281
Location: oswego, il | amazing! |
|
| |
|

Posts: 283
| Those are some nice looking baits! I have a question as I am going back and forth on lure design. I want a realistic profile but I am worried that fins could possibly impede a hook set if the bait is vertical in their mouth. Have you seen any issues with that? I've considered making a rubber insert or something like the sort but that's not really the direction I want to go in. Again, you have some awesome lures here and I love the pics of the process for the trout! |
|
| |
|
Posts: 141
| Thanks guys,
yes you would think fins have the potential to impede a hood set, but I've caught a lot of fish with lures I've installed lexan fins on. Probably some fish were lost too, but if you want fins with a realistic look and no hook impediment go with the bristle fins. They’re like paint brush bristles. You can paint them how ever you like too. The fish can bight right through those. I've never worked with them.. I plan to , but you just need a way of lining them up straight and gluing them in evenly. |
|
| |
|
Posts: 141
| Here's a top water prop bait I just finished today for a friend. It's painted in sort of a Miller Perch pattern with a little orange on the shoulders and a brown belly. The blades are counter rotating, and I thought the extended hardware was a great idea. 


|
|
| |
|
Posts: 141
| Here's an iridescent small mouth bass tail fin glider I just finished, it's carved from Mahogany. Just about to go see how it swims. 


|
|
| |
|
Posts: 132
Location: The Netherlands. | Nice lure`s again !!
I also like the how `to you`re showing here.
|
|
| |
|
Posts: 141
| I'm going to start pouring softplastic baits and I wanted to show you guys the master blank I carved out. I wanted these baits to be a little smaller sized for my first model, it's a ribbed back 4 1/4 inch paddle tail.. I tried to replicate a crappie minnow, but it turned out slightly different. I'm really happy with the looks of it anyway. I still need to decide on the hook set up and make a hardware mold that I can pour the lead into. I'll keep you guys updated on it's progress. Again, thanks for the previous compliments too! 
|
|
| |
|
Posts: 283
| That looks great- I love the detail!!! |
|
| |
|
Posts: 141
| Here are some customs I just finished. They might be the last hard body baits I do for a while. Soft plastics are consuming my interest for now, and I'll have some customs of those to show you guys soon too. Hope you like the lures! 


|
|
| |
|
Posts: 141
| Here are a couple of my first soft plastic rigged swimbaits. This model is called the Tremor. It's 4.25" and it has a hollow tail. I'll be fishing with this bait a ton in the weeks to come! The cool thing is that they're pretty quick to make.


|
|
| |
|
Posts: 501
Location: Norway | Love that swimbait! And your paint jobs on the other bait in this thread is awesome.
Michael |
|
| |
|
Posts: 141
| Thanks, here's some custom paint jobs on the new swimbait. It's hard to catch how pearly these are in the pictures. Can't wait to make some of these for me and go fishing! 


|
|
| |
|
Posts: 141
| Made a couple hardbaits while I was waiting for the soft plastic paints to arrive too.. 


|
|
| |
|
Posts: 1023
| You are a true artist. Wow |
|
| |
|
Posts: 16
| All are seriously awesome....I truly wish I had artistic talent. |
|
| |
|
Posts: 141
| Thanks very much for the compliments guys, This is the first paint pattern I've come up with to offer for the new BGM "Tremor". It's called Yellow Bass. I go with a coat of peal gold over the whole bait, bright yellow on the belly, and highlight peal green on the shoulders. Then just a little black along the top; the gills get a little black too. These baits are a blast to paint when you find the right soft plastic paints! It took me a while, but I found them lol. 
|
|
| |
|
Posts: 141
| Here's a big twitch bait I just finished. It's a foot long, and I think I'm going to have it be a free lure giveaway too. I was small mouth fishing on the river bank yesterday, and I was happy when I caught them at this size lol. 


|
|
| |
|

Posts: 909
Location: South-Central VA | That's a freakin' sweet lure!!! How's it run?
If you're looking for somewhere to give it way, I'll take it!!!!!!
jeremy |
|
| |
|
Posts: 141
| Thanks, it runs shallow and steady. I guess you would say it slithers along because of the joint. If you want a chance to win it you can enter the free lure give away at www.bgmbaits.com. I'm thinking about having a give away every 2 weeks. Good Luck! |
|
| |
|
Posts: 1202
Location: Money, PA | I signed up for that big boy... Awesome looking baits! |
|
| |
|
Posts: 141
| Yeah I happened to noticed your entry in my email Paul, thanks and good luck!
Wanted to show you guys this Longeared sunfish spinbait I just finished. I freakin love making these now that I've learned how to constantly get that wobble action on the retrieve. 


|
|
| |
|
Posts: 141
| Hey everyone,
I have this baby pike spinbait to show you guys. I used some new extra highlight pearl paints on it, and I couldn't get my camera to pick up the flashyness of it.. but it has a layer of translucent highlight pearl green over it's brown back and shoulders that you can't see lol. Hope you like it 


|
|
| |
|
Posts: 141
| Here's a Burbout soft tail jig glider with a glow in the dark twistertail I just finished. 4.5" without the tail and 8" with the tail.


|
|
| |
|
Posts: 141
| I haven’t posted in a while, but here's one of the baits I've been making. It's a 6" brightly painted Brook Trout shallow crankbiat. 


Here's a pic I snapped as I was taking off the masking too.. Gives kind of an idea about the painting steps.

|
|
| |