|
|
Posts: 641
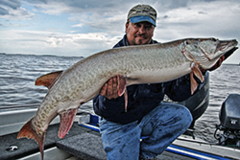
Location: Bloomington, MN | You have the fish in the net, the pliers, the hookouts, the gloves, Knipex hook cutters, and if necessary Hook Pick are all handy. You tell "Carl", your partner for the day, to get the camera out of your bag. As they say on commercial flights, "Things may have shifted". Your waterproof bag also has numerous happy zippered compartments to search. When "Carl" finally retrieves the camera that is in a zip lock freezer bag inside a worn Seagrams bag, you grab the fish, bump board it, and then pose. "Carl" then proceeds to stare at the camera as if it is a cockpit panel on a Boeing product. You have had the fish in the net too long and out of the water longer than needed, when "Carl" finally states "I think I got it". After a the release that "Thank God!" went well, you run to your B.S. non-waterproof 6 year old $100 sumthin digital camera to see if the image of your P.B. was captured. The photo turned out of the fish, but the shouting out of instructions for operation of the camera are evident on your face. This obviously is not the way to run the "Showgram"! Many of us use very expensive rods, reels, and lures. The $150 digital cameras that were available 6+ years ago are basically JUNK! I purchased a waterproof Olympus 14 MP Stylus tonight due to my "incident" last weekend. There is a muskie guide (Get The Net dot com) , and he has spectacular jaw dropping photos on his web site. He promotes Pentax cameras and also MuskieFirst.com, but I needed to get one tonight and they are order only at Best Buy...I hope I don't get buyers remorse. If you are fishing with someone "new", please spend 5 minutes going through instructions on how to work your and their camera, and exactly where it is located prior to making the first cast. Also, if you both have an immediately available camera, make sure you get a shot or two from both. The "I will email you the pics when I get home thing" doesn't always happen as promised.
Edited by Clark A 7/17/2010 12:57 AM
| |
| | |
Posts: 123
| That's too bad. You'll get a bigger fish and better picture some day though. I wrote an article that some here may get some information from that ironically was titled "After the catch". It's a couple years old and was in Muskie magazine with photo support. The photos aren't included here so disregard when it mentions the examples.  Here it is if anyone wants to read it. Here it is if anyone wants to read it.
After The Catch
Getting the most from your muskie photographs
by Brad Waldera
Better photos can help you remember and share those special muskie memories.
So you’ve caught a special fish you’d like to remember with a great picture. What do you do to make sure your photo is as equally fantastic as the fish you just caught? Here are a few tips you may want to keep in mind, beginning with the steps to take before leaving your house, and ending with the moment you release the muskie’s tail from your hand.
At Home
Before leaving for the lake, there are a few things to consider regarding your camera. You’ll want to charge the battery, or in some cases bring extra batteries along in case yours lose their charge. You’ll also want to know how to quickly change the settings of your camera, if it allows for that. Many fishermen start fishing early in the day or fish late into the night, and the lighting is not the same as it is at noon. If you can adjust your shutter speed, ISO, or aperture settings with your camera, make sure you know how to do it, and do it quickly. You won’t want to waste that time later.
You will also want to make sure your camera is set to take the largest resolution shot possible. On many cameras you can adjust the size of the photos you’ll be taking, such as small, medium, and large. A lot of people pick the smaller settings to be able to fit more images on their memory cards, but that also means that those pictures can’t be printed as large without a loss in quality. Can you imagine catching a 60-inch muskie and only having a 5x7 picture to show for it? My camera is a 6 mega pixel model and I keep it set on the highest/largest photo size possible. I can print pictures from that setting to poster size. If you can, adjust your camera to the highest resolution setting; you may be very glad you did later on.
At The Lake
Before heading out on the lake for the day, take a moment to go over the settings of not only your camera, but your fishing partner’s camera as well. Many times we’ll each bring our own camera and don’t think about having to use our friend’s camera for pictures of their fish. Show each other the basics of operating your cameras, such as turning them on/off, focusing them, etc. It should only take a minute or so, and may help you get a great muskie picture for your friend with his or her own camera.
On The Water
At this point you’re on the water, knowing your gear is in proper working condition and how to operate it when you’ll need it. Next thing you know, your buddy is yelling for the net. If the net is already extended and readily available, I may quickly pull the camera from the bag and turn it on while my buddy is still fighting the fish, or even attempt a few shots trying to get one of the muskie in mid-air or of the expression on my friend’s face as he’s battling the fish. You may need a very understanding fishing partner to get away with grabbing the camera and not the net at that point, but there are some out there. Now you stop taking pictures and net a beautiful muskie for your friend.
In The Net
While your buddy is unhooking the fish, you may want to snap a few photos of the process. What I like to do (or tell my buddy to do) immediately after unhooking the fish, but before lifting it from the net supported with both hands, is to take off my sunglasses and tilt up my cap. A great muskie picture isn’t nearly as great if nobody can tell who it is holding the fish. Again, this is something that takes literally 3 seconds to do, yet we often forget all about it in the heat of the moment. We end up with a picture that just isn’t quite what it could have been.
In The Boat
Now you’ve got your camera ready, your friend has his sunglasses off and his cap tilted up a little and you’re ready for him to hold the fish up for a photo. At this time remind him to use both hands to keep the fish supported as horizontal as possible while he lifts it from the net, as it is will reduce stress on the muskie. Many folks lift the fish from the water vertically to take a horizontal picture, which kind of defeats the purpose. Before taking the fish from the net for a photo, quickly check your boat position. Many anglers prefer to have the front of the boat behind them, or the back of the boat behind them in their pictures. Will the sun be in their eyes in their current position? You might want to quickly turn the boat before lifting the fish from the net.
Fill The Frame
Now we’re at another tricky step. Even though we want to keep the time the fish is out of the water to a minimum, there is one other thing we can do very quickly to help ensure a better photo. Fill the frame. If you’ve just caught a great muskie worthy of a photo, you’ll want the fish to be the main subject of your shot, not the one third of open water on each side of your buddy. Zoom in to get a shot like this one. If your camera is like mine and has a fixed lens, meaning you can’t zoom in or out, simply move forward or backward until you fit most of the fish and your friend into the shot you see through the viewfinder. Make sure you don’t step back too far, if you know what I mean.
Lighting
So now your buddy is holding the fish, properly supporting it in a horizontal manner, his sunglasses off, his cap tipped up, and you’ve got the camera ready, and the frame is filled with him and his fish. I normally take a couple of quick pictures without using the flash, and then quickly take a couple with it. Depending on the weather conditions and lighting, you never know which will give you the best results and it only takes another second or two for the extra flash shots.
Letting It Go
After you’ve taken a few quick shots, it’s time to get that fish back in the water. This is another great photo opportunity. As enjoyable as it is to catch a big muskie, it is often even more enjoyable to release one, and a photo capturing that moment can be a great memory for the angler. Please remember to take the same care when placing the fish back into the water as you did when removing it from the net for the photo.
For this type of release shot, you may want to lean a bit over the side of the boat for the best angle (but don’t lean too far). Take a few shots of the entire process, and you may end up with some real beauties.
Going Home
Now that the fish has been released form your buddy’s hand, you may have a chance at getting a couple more shots before the fish heads back home. Many times the fish will just kind of mosey along on the surface for a few moments and if you’re lucky you may end up getting a shot like this one.
First and Foremost
First and foremost is the welfare of the fish. Please be sure to keep the risks to the fish minimal by keeping it out of the water for as short of time as possible. Not every muskie must be photographed. At times, if fishing conditions (such as warm water) have already placed the muskie in a high stress condition, the best photo tip I can suggest is to not take the picture at all.
I hope you will keep a few of these tips in mind the next time you’re on the water and that they help you obtain even better photos of your muskie adventures. Better photos can help you remember and share those special muskie memories. Good fishing!
| |
| | |

Posts: 1184
Location: Iowa Great Lakes | My boat cameras simple and easy to use, just a cheapie but takes good pics. Mines normaly laying on the dash, beside my seat or in my bag all within easy reach. My good camera only goes out on special occasions. I can live loosing an $80 camera the $500 one would hurt. You don't need an expensive camera to get good pics in the boat. | |
| |
|